Email Setup - Android (IMAP)
Take your Business Beyond the Horizon
Copyright ©2022, Web Ahoy WebCenter, Orlando, Florida - All rights reserved.

Phone: 407-494-3844 - info@webahoy.com
.
Before You Begin
Prepare your email account and password. Before you set up an email client, make sure you are able to log in
to your webmail through any of these links:
http://mail.[your domain name].com
OR
http://mail.ahoybuilder.com
.
To Set Up Android Mail
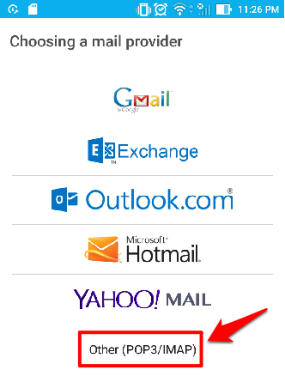
1. Open the default Mail app on your Android device.
2. Select "Other (POP3/IMAP)".
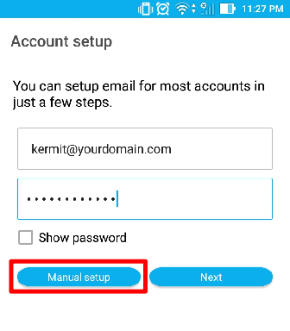
3. Fill in your email address and your password. Click "Manual setup" to continue.
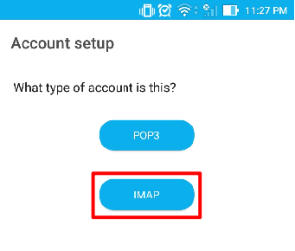
4. Select "IMAP" on the next screen.
5. Enter the following information:
Username
- The complete email address of your email account
Password
- The password for your email account
IMAP server
- mail.b.hostedemail.com
Port
- 993
Security type
- SSL/TLS
IMAP path prefix
- Leave it blank
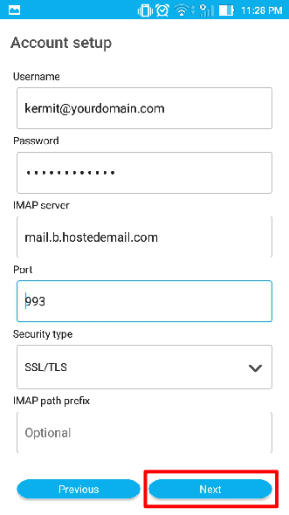
6. Click "Next". The mail app will load and check the settings you entered.
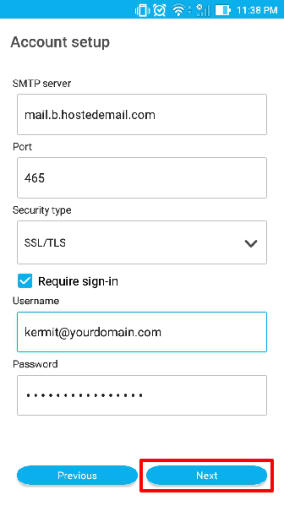
7. On the next screen, enter the SMTP settings:
SMTP server
- mail.b.hostedemail.com
Port
- 465
Security type
- SSL/TLS
Require sign-in
- Mark this checked
Username
- The complete email address of your email account
Password
- The password for your email account
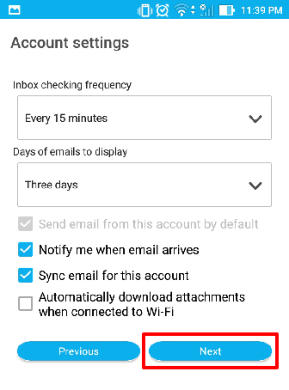
8. Hit "Next". The next screen will let you choose how frequently your mail app would sync. Choose whatever
frequency you think works best for you, but we recommend the shortest time so you get your emails quickly.
9. Tap the "Next" button again to get to the last step. Fill in the following details:
Give this account a name
- This information is only used to better differentiate your account from
one another.
Your name
- Your recipients will see this name when they receive your message.
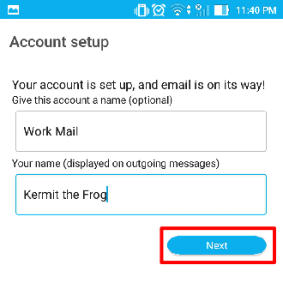
10. Finally, hit the "Next" button and wait for your email setup to complete.


Everything you need to make your
presence known on the Internet.
Domain Names
Email Setup - Android (IMAP)
Web Hosting
Websites
Unique address where users can access your
website.


Marketing
Security
Email


Showcase your work. Sell your products.
Post your website on the Cloud for worldwide
access.
Advertise! Make your website easy to find.
Communicate directly with your customers.
Reassure your visitors. Build confidence and
trust.
AhoyBuilder
All 6 components shown above
integrated into an easy-to-use system.
Website Builders
The world’s most popular website building
platform.


Powerful, yet simple, cloud and desktop
website and graphics creation software.

Custom Design
Please contact us for more information.


Copyright ©2022, Web Ahoy WebCenter. All rights reserved.
Orlando, Florida - Phone: 407-494-3844 - info@webahoy.com

For account login, support, and contact information,
please select your product above.